Showing posts with label 3D printing. Show all posts

Wednesday, April 26, 2023

A Loud Acheta Domestica

I found this model online quite a few years back. In fact the first time I printed it was before I got into resin printing; I printed in PLA and used a ton of filler and did a bunch of sanding, then decided it was too much work and gave up. When I was stuck for ideas for a friend's birthday, I remembered this old thing and decided to try again, printing a fresh version and hitting it with some paint.

I no longer remember which version of the model I printed; there are several online. I modified the model somewhat, cleaning it up and supporting it for resin printing (the original was cut for FDM printing), and also modelling a 3mm hole up the handle to make it easier to paint. I thought of making a display base that incorporated a rod to hold the model, but I came across a fancy display base by Falconman, and created my own simpler version using that as inspiration (the one in the photos was an early version in grey PLA, I reprinted later in white PLA).

I wanted to paint it in chrome, which I figured would be easy: prime in gloss black, mask off the handle, airbrush chrome, varnish, done. Sadly it was not that simple. First of all I had to clean it all up. So removed the supports as best I could, sanded, applied greenstuff then later a milliput wash (following Marco Frisoni's guide) to fill the divots and other imperfections, and then sanded again, washed and left it to dery, before finally priming with Vallejo 73.660 Surface Primer Gloss Black.

At which point I found a number of fairly noticeable imperfections that hadn't been obvious before. I tried to fix them but only ended up damaging the primed layer in a way that couldn't easily be fixed. So I stripped the model using a local brand of household cleaner (I couldn't find any Dettol). Now I was worried the dettol would soften the fillers if I left it to soak, so I would apply the dettol and brush it off quickly. This made the stripping process more labour-intensive than usual.

Once I had stripped all the primer, I applied more filler to the trouble spots, left it to cure, and sanded yet again, washing the dust off and leaving it to dry. This time I primed with Tamiya 87064 Fine Surface Primer Light Gray. This was an aerosol primer than, in my experience, makes it much easier to do repairs as it doesn't "peel" the way acrylic airbrush primers do when you try to sand over them. The light grey coat made it much easier to find any remaining imperfections; I did a bit more sanding before washing and priming with gloss black again.

And that's where I screwed up the primer. See, I usually prime with a syphon airbrush that puts down a very heavy coat of paint. But I was feeling so precious about this model that I wanted to try to be more careful than usual to avoid and primer buildup - which I had experienced that first time I primed, resulting in large "droplets" of exess primer collecting and running down the handle.

So this time I primed using a fine-nozel double-action gravity airbrush. And for some reason the "gloss" black went down very matte through this airbrush. Which was a big problem, because having a smooth glossy basecoat is essential for the chrome paint to work properly. So when I came to apply the Alclad II Lacquer ALC 107 Chrome, it ended up looking like a slightly matte silver rather than a shiny chrome!

What's more I did a bit of damage to the handle when pulling off the mask, and when I tried to fix it with the original gloss primer it came out FAR more glossy than the rest of the handle. So I decided to try to apply a gloss varnish (rather than the correct "aqua" varnish recommended for chrome) in the hope that it would npt only homogenize the handle finish, but also make the model look more shiny. Instead the opposite happened, and it ended up looking even more matte! You can see it here next to a test model I painted much less carefully:
You can clearly see the huge difference in surface finish. At least it fixed the handle finish. In theory the surface, despite looking matte, should have been fairly smooth. So I decided it couldn't hurt to try to apply another coat of chrome, using the syphon airbrush this time to put down a heavier coat (after masking off the handle again). This actually helped; the result was now a satin silver rather than a matte. Still a far cry from the intended chrome, but at least it didn't look terrible now:
At this point I just didn't have it in me to put any more work into it (in my defense I've been pretty damned busy these last few months). So I called it good enough, doing a final bit of touch-up to the handle and hitting it with a coat of Alclad II Lacquer ALC 600 Aqua Gloss.


This is the second time I try to paint a relatively large display model, and once again airbrush issues meant that the final finish on the actual model was worse than the final finish on the test model. But I suppose it's my fault this time and not the airbrush, not really. Well, it was a learning experience, especially when it comes to effectively cleaning resin 3D prints. The milliput wash was great, but a hit with an aerosol primer and then a second cleanup pass is almost essential to make sure you've really fixed all the surface issues. I've heard that hot water makes it easier to remove supports; I tried and and it does make it easier - especially for very heavy supports - but I'm not sure it actually improves the final surface finish. Some smoothing and filling does still seem necessary at any rate.

I would love to come back someday and give this model a second try, preferably using a version with separate handle scales so I don't need to do any masking or anything. But that sounds unlikely tbh. Oh well. I'm trying to get back to actual painting - you know, with a brush, not just airbrushing. I kinda miss it. Finding the time is a real issue.

Tuesday, April 18, 2023

More Fancy Boxes

As part of my continuing efforts to improve my storage and transport setup for my games, I put together a dice box for that Monpoc doubles as a building. The file is up on Thingiverse. I printed up two buildings that hold enough dice for a single player each. I will probably play them as skyscrapers or appartment blocks. I considered trying to model it to look more like one of the official buildings, but I decided efficiency and ease of printing was more important. It's also nice that they're really easy to paint. I painted the windows with Green Stuff World 1864 Metalcolor Sharkfin Blue, but I found it didn't create enough contrast (either color or value) on the grey building so I went over it with Vallejo 71.071 Model Air Metallic Arctic Blue. For the white building I went over the windows with Citadel 'Ardcoat first, then painted the Sharkfin Blue on top. This gave a smoother layer. It may look very simple, but this took several iterations and a LOT of swearing at my printer to get to this point. I might make improvements in the future, but for now this will do.

Wednesday, May 4, 2022

He's A Big 'Un

This is the largest thing I've printed in resin, and also the largest figure I've painted. Obviously I was trying to capture the look of the cinematic version. I wanted to capture the feel of that moment where his face starts to light up, and you just know there's a big energy blast coming. The Destroyer
I airbrushed a primer coat of Vallejo 73.660 Surface Primer Gloss Black. I then sprayed Vallejo 71.073 Model Air Metallic Black from around 45 degrees above, Vallejo 71.072 Model Air Metallic Gunmetal from around 10 degrees above, and Vallejo 71.065 Model Air Metallic Steel from directly above, pretty much just on the head and shoulders. This left some black visible on the downwards-facing surfaces.

I painted Vallejo 70.950 Model Color Black thinned with a lot of Vallejo 73.596 Glaze Medium directly into grooves. I actually went over the spikes with a light drybrush of Steel, as I felt they were not standing out enough and I wanted them to pop a little more.

I built up the glow by painting layers into the grooves, then drybrushing the same colour around them. I started with Vallejo 72.711 Game Air Gory Red thinned with a bit of Glaze Medium for most of the grooves of the face, then drybrushed Citadel Foundation Mechrite Red onto most of the face. This was followed with Vallejo 72.106 Game Color Scarlett Blood painted then drybrushed over a smaller area (again thinned with Glaze Medium for the grooves). In the same way I worked through Vallejo 72.008 Game Color Orange Fire, Vallejo 72.007 Game Color Gold Yellow, and Vallejo 72.005 Game Color Moon Yellow thinned and painted into face grooves and eyes.

I had been applying the layering at a small scale on the eyes to create a transition, taking it all the way up to white by painting Formula P3 Morrow White thinned with glaze medium into centers of eyes, drybrushing Gold Yellow around the eyes and surroundings, touching up a smaller area of the center with the white, drybrushing Moon Yellow over the eyes and immediate surroundings, and then a final tiny spot of white in the very centers of the eyes.

I had a lot of difficulty with the base. I thought of warm desert tones, to match the Earth terrain the Destroyer walks across at the end of Thor, but with how dark the model is I was afraid even darker warm tones might distract slightly from the glowing face, which I really wanted to be the center of attention. So I went for cold tones, representing the vault on Asgard where we first see the Destroyer. I initially basecoated with a roughly 2:1 mix of Vallejo 70.899 Model Color Dark Prussian Blue to Vallejo 70.862 Model Color Black Grey. I then drybrushed on The Army Painter Warpaints Viking Blue, then a very very light drybrush with The Army Painter Warpaints Ice Storm. This created a much brighter and more saturated look than I had hoped for. I was able to darked and desaturate it somewhat with a drybrush of grey (I don't remember the exact shade); it was still far from perfect but I didn't know what else to do.

I applied an airbrushed layer of Vallejo 26.517 Gloss Acrylic Varnish, then I brushed Vallejo 26.518 Matt Acrylic Varnish directly onto the base to matt it down.


Overall it's a fairly simple model with a fairly simple colour scheme, but a surprising amount went wrong. I left supports to the software, and they were not as well placed as they could have been; cleanup was quite a pain. Some of the grooves, especially around the head, needed to be deepened a little. I didn't want the spikes to be too sharp as I felt this would leave them more vulnerable, so I used a rotary tool with a very soft fiber buffing wheel to take off the tips and leave them more rounded.

Perhaps the most frustrating part is that I actually printed some smaller test pieces, and got results that I liked for the metallic effect, with a shiny metallic effect that seemed to add depth and highlighted the model's contours. But when I attempted to apply the same method of zenithal basecoat to the actual model it looked a fair bit more dull and flat, and just less metallic. I tried to take a picture to illustrate the effect; it's not obvious in the photo but you can still see the model in front is shinier and more metallic, and the difference was clearer in real life: I was having a lot of issues with my airbrushes when I went to paint the actual model, so that was probably part of the issue. I suspect I might not have been heavy enough with the Vallejo Steel, or perhaps I had the airbrush too far away so the paint dried too much before landing and didn't form a smooth shiny layer?

I dunno. I guess he looks good enough overall. Hopefully future statues will come out better.

Friday, April 29, 2022

Printed & Painted Skeletons

The Walking Undead, sworn enemeies of the Lizardfolk. I was working on these guys alongside the lizards (and they gave me many of the same problems), but they took a little longer to finish due to the freehand banner on the Commander. Skeletons:
These were printed on a Longer Orange Mono 4K with black Elegoo Standard Photopolymer Resin. I was using an 0.025mm layer height at 1.5 seconds exposure per layer, with a 1 second light-off delay and no AA. It took me two attempts to get the supports set up so all the models printed without any missing bits.

They were primed with Vallejo 73.660 Surface Primer Gloss Black, then I airbrushed a zenithal basecoat of P3 Rucksack Tan, Vallejo 71.132 Model Air Aged White, and P3 Menoth White Highlight.

I picked out wood in GreenStuffWorld 1834 Quicksand Brown and leather in GreenStuffWorld 1832 Redwood Brown. Brass was Scalecolor SC-92 Victorian Brass over one of the two browns, similarly the gold crown was Citadel Layer Auric Armour Gold over brown. Steel was Vallejo 71.072 Model Air Metallic Gunmetal. We settled on dark blue for the clothing, I used Vallejo 70.899 Model Color Dark Prussian Blue. The arrow fletching was basecoated with Vallejo 72.008 Game Color Orange Fire.

After that was done I gave them all a dip in The Army Painter Quickshade Dip Strong Tone, making sure not to let it pool too heavily anywhere. After giving it a couple of days to fully dry, I went back and added some more details. The blue clothing was roughly and agressively highlighted with Vallejo 72.021 Game Color Magic Blue. The arrow fletching was given some highlights/detailing with Vallejo 72.006 Game Color Sun Yellow. Brass was highlighted with Citadel Layer Auric Armour Gold, steel with Citadel Layer Ironbreaker, and leather with Citadel Layer Skrag Brown.

I then carefully applied a layer of Citadel Texture Blackfire Earth to the bases, which I washed with Citadel Shade Agrax Earthshade then drybrushed with P3 Rucksack Tan. After this the base rims were cleaned up a bit (not enough) with some fine-grit sandpaper, then painted black. The models were then airbrushed with a coat of Vallejo 26.518 Matt Acrylic Varnish.

Banner:
I laid down an outline of GreenStuffWorld 1796 Kraken Green over the area to be painted. The flame was layered with Vallejo 72.026 Game Color Jade Green, a mix (2:1 maybe?) of Scalecolor SFG-22 Surfer Orc Flesh and Citadel Edge Gauss Blaster Green, then just Gauss Blaster Green. The scythe handles were GreenStuffWorld 1831 Choco Brown, with a thinner inner line of and Vallejo 71.287 Model Air Ija Kakhi Brown. The blades were blocked in with Vallejo 72.054 Game Color Gunmetal, then the edges dotted with Vallejo 71.063 Model Air Metallic Silver RLM01 to give a rough, agressive look.


Like the lizards I was trying to get these guys done a little bit quickly; I actually spotted several small mistakes while prepping the photos that I hadn't noticed while painting. I'm not sure the blue was the right choice, but I wanted their main colours to be very distinct from the lizards. Perhaps I should have used red cloth for the skeletons and blue for the lizards? I don't know. Older, dirtier colours like simple brown were perhaps the more "thematic" option for reanimated skeletons, but that sounded really boring. Dark blue feels more sinister, shadowy than some other options, I think they look interesting.

I considered picking the entire banner out in a different colour, but for gaming reasons I didn't want to make them too busy (colour-wise) as I was afraid it would make them read a little less easily on the table. Well, that's my justification; if I am to be honest laziness certainly played a factor... I mean, I say that, but then I spent quite a few hours figuring out then executing the freehand logo. Which I think came out pretty well considering I'm not great at this sort of thing. At the very least the pop of green looks nice and will help the commander stand out on the battlefield.

Tuesday, April 26, 2022

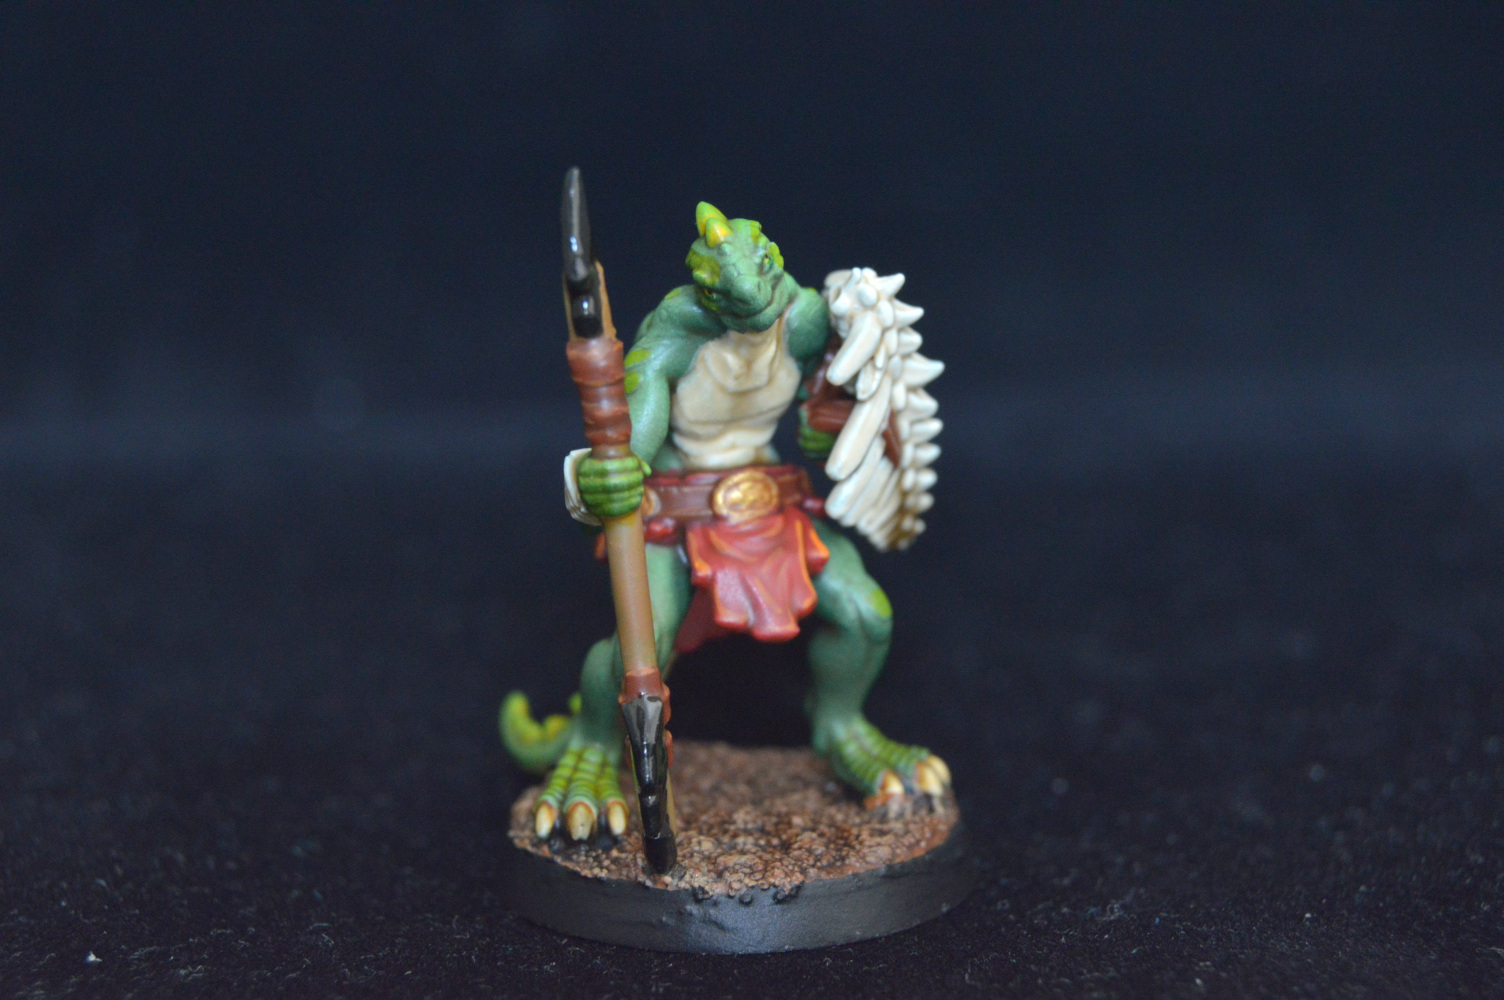
Printed & Painted Lizardfolk

I printed and painted these guys on request. The digital models were provided but I had a fair bit of difficulty with the supports, both figuring them out in the first place and also cleaning them off without leaving too much damage. There were also some (barely noticeable) print artefacts that manifested in the form of strange vertical seams; I think this was related to the resin somehow as I'd never seen that with the resin I was using before. This was a new brand of resin for me, and it seems the bottle had been lying around for a while with a cracked cap. Well, I've got some new resin on the way so hopefully I won't have this kind of problem again. Lizardfolk:
These were printed on a Longer Orange Mono 4K with black Elegoo Standard Photopolymer Resin. I was using an 0.025mm layer height at 1.5 seconds exposure per layer, with a 1 second light-off delay and no AA. It took me two attempts to get the supports set up so all the models printed without any missing bits.

They were primed with Vallejo 73.660 Surface Primer Gloss Black, then I airbrushed a zenithal basecoat of GreenStuffWorld Acrylic Color 1797 Forest Green, Vallejo 72.729 Game Air Sick Green, and Vallejo 72.732 Game Air Escorpina Green.

I went over their bellies in Formula P3 Menoth White Base. The eyes were Vallejo 72.005 Game Color Moon Yellow with a dot of Vallejo 70.950 Model Color Black. The claws were basecoated in Formula P3 Menoth White Highlight then given two coats of Citadel Shade Seraphim Sepia. Their crests and spines were painted in Vallejo 72.007 Game Color Gold Yellow then drybrushed with Citadel Layer Moot Green.

I picked out wood in GreenStuffWorld 1834 Quicksand Brown and leather in GreenStuffWorld 1832 Redwood Brown. Brass was Scalecolor SC-92 Victorian Brass over one of the two browns. Any bone was painted Vallejo 71.132 Model Air Aged White. Cloth and feathers were built up to Citadel Colour Base Mephiston Red. The arrow fletching was basecoated with Vallejo 72.008 Game Color Orange Fire. Stone weapons were simply Vallejo 70.950 Model Color Black.

After that was done I gave them all a dip in The Army Painter Quickshade Dip Strong Tone, making sure not to let it pool too heavily anywhere. After giving it a couple of days to fully dry, I went back and added some more details. The red cloth and feathers were given simple highlights of Vallejo 72.008 Game Color Orange Fire. The arrow fletching was given some highlight/detail with Vallejo 72.006 Game Color Sun Yellow. Brass was highlighted with Citadel Layer Auric Armour Gold, and leather with Citadel Layer Skrag Brown. I then picked out some skin details with a glaze of Citadel Glaze Lamenter's Yellow.

I then carefully applied a layer of Citadel Texture Blackfire Earth to the bases, which I washed with Citadel Shade Agrax Earthshade then drybrushed with P3 Rucksack Tan. After this the base rims were cleaned up a bit (not enough) with some fine-grit sandpaper, then painted black. The models were then airbrushed with a coat of Vallejo 26.518 Matt Acrylic Varnish. Once this was dry I applied Vallejo 26.517 Gloss Acrylic Varnish onto the stone weapons, then after taking photos I ended up adding a dot of gloss varnish to the eyes as well.

I was trying to paint these guys quickly, using things like quickshade and only minimal, fairly simple, highlighting. I think they look pretty decent; certainly tabletop-worthy. I'm not sure if they would have turned out all that much better if I had tried to use more advanced techniques on them, as I'm not as good with organic models as I am with armoured or mechanical ones. I probably could have done the eyes a bit better, though it would have been a lot more painful to even try - I was actually very lucky with the eyes, and happened to get them mostly right first time, something of a miracle if I'm to be honest. Overall I'm happy with the models.