Friday, December 23, 2022

Grabby Gorillas

I finally finished the last of my Apes, at least for the time being.
Assault Apes:
As with my previous ape units, I had made the mistake of priming these guys in black (specifically Vallejo 73.660 Surface Primer Gloss Black), airbrushing over it with Formula P3 Menoth White Highlight to try to get a better undercoat for the colours. In this case I followed up with an airbrushed basecoat of Vallejo 72.707 Game Air Gold Yellow.

The fur was GreenStuffWorld 1832 Redwood Brown drybrushed with Formula P3 Rucksack Tan. The leather was Formula P3 Bogrin Brown. Brass was Citadel Layer Gehenna's Gold over brown, usually Bogrin Brown. Steel was Vallejo 72.054 Game Color Gunmetal. The lenses were my usual mix of Green Stuff World 1872 Metal Color Neptunus Blue and Scalecolor SC-66 Speed Metal. I applied Vallejo 72.730 Game Air Goblin Green over the shoulder armour to tie them to the rest of my Apes.

The skin was basecoated Vallejo 70.992 Model Color Neutral Grey, then roughly highlighted with Vallejo 71.132 Model Air Aged White. The teeth, nails, and eyes were picked out with Menoth White Highlight, then the eyes were given dots of Redwood Brown. Finally the skin, eyes, and mouth were glazed with Citadel Shade Seraphim Sepia.

For the blue lamps I tried to create a transition by blending from Vallejo 72.021 Game Color Magic Blue, through Citadel Edge Baharroth Blue, up to a mix of Baharroth Blue and Vallejo 70.853 Model Color White Glaze. For the purple lamp I transition from Vallejo 70.960 Model Color Violet, through Vallejo 72.776 Game Air Alien Purple, up to a mix of Alien Purple and White Glaze. In all cases I tried to thin the mixes with lots of water and medium to try to build up the transitions with glazes, though the results were not as smooth as I had hoped.

I tried to create OSL effects using drybrushes of Magic Blue and Baharroth Blue. For the purple lamp I drybrushed Violet, Alien Purple, and then a mix of Alien Purple and Formula P3 Morrow White.

After cleaning up the yellow armour with Vallejo 72.007 Game Color Gold Yellow, I dipped the models in The Army Painter Quickshade Dip Dark Tone, carefully mopping up the excess dip with a brush to prevent unwanted pooling. This was followed with an airbrushed coat of Vallejo 26.518 Acrylic Varnish Matt.


These guys were more work than I like to put into my Monpoc units, especially with the yellow and the glows. I had a hard time painting the details; my eyesight is not what it used to be. I screwed up the skin highlights, especially around the face; their faces just look messy and overdone. The mouths don't look great either. Overall I can't say I'm completely satisfied with them; I'm not sure the yellow works that well with the brown fur and green armour. Although they do add a nice pop of colour in the family photo:

Tuesday, November 1, 2022

A Wasteland Survivor's Best Friend

I was introduced to Fallout Wasteland Warfare alongside Fuzzy. The game was hosted by The Man In Black and Mailman. I played the Survivors alongside Mailman; our goal was to ativate consoles to pump enough water to a settlement. Fuzzy and MiB ran the Super Mutants, their goal was to down 4 of our models. The Super Mutants went first, and got a dog into melee with our most important model on the very first activation. After a few turns of combat both sides were down to just two models, with Dogmeat proving to be a force to be reckoned with. And then the next few turns were a pathetic slap-fight with nothing dying; in the rare event that a model managed to land an attack, the defender typically passed their armour save. Eventually we gave up and called it as people had places to be.


We had a lot of fun, though the game will definitely take some getting used to. It's very token-heavy, with more complexity in the dice/action system than I expected. I'm not sure that complexity does all that much to increase meaningful player decisions though; of course I didn't actually read the rules so there could be a lot more depth that we just didn't touch on in this intro game.

Friday, October 7, 2022

Cutting Foam

I finally figured out an effective way of cutting foam to fit my miniatures. This involved putting together a couple of custom tools. I have described the method in detail here.

Now to find the time and effort to actually put it into practice for all my minis. This could take a while.

Wednesday, July 27, 2022

The Model That Got Me Into Resin Casting

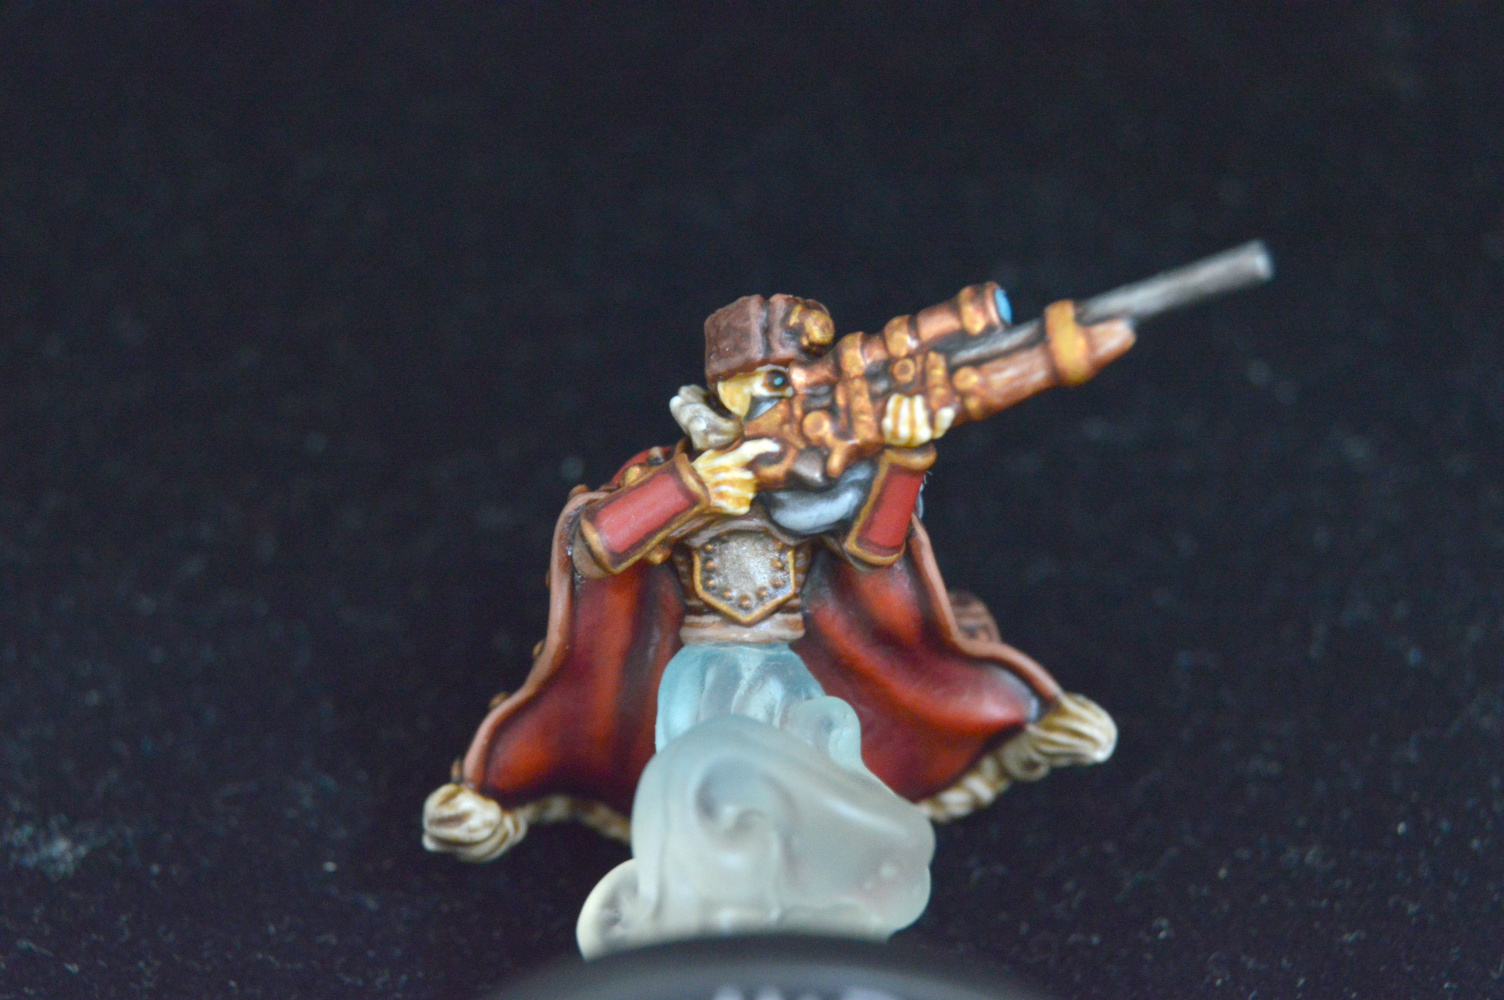
When I saw the first concept art of Ol' Grim, I was instantly hooked. As if Widowmakers weren't already cool enough, they went and gave us one that's a ghost. How cool is that? As impactful as the official colour scheme is, I decided I wanted to go proper ghostly with this guy, and took my first steps into resin casting in order to do it. He's actually surprisingly difficult to photograph; I put a fair bit of of work into both sides of his coat, but the underside is only really visible from underneath, and you have to look almost straight down to appreciate the detail on the top. This was the first model in quite some time that I really wanted to paint for myself; I've only been painting stuff for others, or knocking out quick Monsterpocalypse models that I wasn't really invested in, for a while now. It was surprisingly hard to get started; I feel like I'm being pulled in so many different directions these days that the idea of sitting down to spend many hours painting a model feels like a heavy burden. But luckily I had a bit of free time and I mostly enjoyed the process once I commit to it.

Casting the clear bit took a couple of tries. The first attempt had some holes in it. The second time was better, and I was mostly able to fill the few holes that did occur using UV resin. I also tried to create a bit of an internal swirl of a blue glow-in-the-dark powder pigment, but it basically just sank to the bottom of the mold (I was using vibrations to help bubbles rise to the surface, and that seemed to help the powder to sink). Luckily I think that actually looks pretty good; I like it more than the first completely clear cast anyway. It looked pretty cool after I hit it with some gloss varnish; I was tempted to leave it this way, but figured I would save this look for water and ended up finishing it with matt varnish. I painted the upper assembly separately. While doing so I realised there was a miscast on the muzzle of the rifle. I tried fixing it with greenstuff, but ultimately decided I would be happier if I modified the gun, so I stripped the paint (which wasn't too bad as I had only just started) and customized the gun barrel and stock. In the photos below you can see some paint that was dissolved in blob of superglue on the face and wouldn't come off. Don't worry, I eventually got it off using a superglue remover.
Ol' Grim:
The upper body was primed with Mr. Hobby Mr. Finishing Surfacer 1500 White. The coat and ushanka were basecoated in Green Stuff World 1832 Redwood Brown. I washed them with Citadel Shade Agrax Earthshade then applied some rough highlights with Reaper 09225 Master Series Paint Core Colors Redstone Highlight. The coat lining was first basecoated with Citadel Base Khorne Red, then I built up highlights using thinned Citadel Base Mephiston Red then thinned Vallejo 72.010 Game Color Bloody Red. I gave it a wash of Citadel Shade Carroburg Crimson, then re-applied the highlights of Bloody Red.

The armour was also basecoated in Khorne Red then highlighted in Mephiston Red. The armour trim was basecoated in Redwood Brown. I wanted the trim to be brass, but I didn't want to go too bright as the rest of the coat was quite dark, so I used the slightly dark Scalecolor SC-92 Victorian Brass. This was washed with Citadel Shade Agrax Earthshade, which was allowed to darken the adjacent red areas to shade them. I then highlighted back up to Victorian Brass. The breastplate used the same brass for the trim, but the rest was Citadel Base Leadbeltcher (which I might have given a light wash of Citadel Shade Nuln Oil).

I didn't want the shirt to be in the same colour as the coat, but I still wanted it to be in the off-white/brown range, so I ended up using Formula P3 Bootstrap Leather, which I washed with Agrax Earthshade then highlighted with a mix of Bootstrap Leather and Formula P3 Hammerfall Khaki.

For the rifle stock I went with Formula P3 Rucksack Tan, on which I tried to paint a wood grain effect using P3 Menoth White Highlight. I went for a brighter brass on the rifle itself in the hopes that would help differentiate it from the armour a little, using Citadel Layer Gehenna's Gold. I didn't want this big solid block of brass covering most of the rifle, so I painted the scope in Vallejo 71.068 Model Air Metallic Copper. I then washed all the rifle wood, brass, and copper with Citadel Shade Ogryn Flesh. I did then roughly highlight the brass with Scalecolor SC-73 Dwarven Gold as the wash had blended it in a bit with the copper. The badge on the ushanka was painted the same way as the brass on the rifle. The steel rifle barrel was painted in Vallejo Game Color Chainmail Silver (again, aiming for a brighter colour than the armour) then washed with Citadel Shade Nuln Oil. I added dots of my now-standard mix of Green Stuff World 1872 Metal Color Neptunus Blue and Scalecolor SC-66 Speed Metal for the scope lenses.

I had a hard time with the fur trim. A light colour felt right, but I didn't want it to blend in to the bones. I settled on a basecoat of Vallejo 71.122 Model Air US Desert Armour 686. I tried shading it with Seraphim Sepia, but I didn't like it, so I painted over it with a fresh coat of US Desert Armour 686. I remembered that I had a whole bunch of brownish Army Painter washes stashed away somewhere, so I pulled them out and tried to compare their colours. I settled on The Army Painter Quickshade Washes Soft Tone, which seemed to me to be similar in colour to Citadel's Agrax Earthshade but somewhat lighter. I then drybrushed the fur with Formula P3 Jack Bone, then went over the tips with another drybrush of Formula P3 Morrow White.
Ol' Grim's ol' bones were painted in P3 Menoth White Highlight, washed with Citadel Shade Seraphim Sepia, then highlighted back up with Menoth White Highlight. I was running out of browns, so I settled on Formula P3 Bogrin Brown for the eyepatch, which I also shaded in Seraphim Sepia. After the bone was done I added extra shading to the eye with Nuln Oil, then added a dot of Citadel Edge Baharroth Blue on the raised center. The beard was basecoated in Vallejo 70.992 Model Color Neutral Grey (by accident; I originally intended to use a lighter shade but picked up the wrong bottle and decided to go with it) then washed with Nuln Oil. It was then drybrushed with Vallejo 70.990 Model Color Light Grey, then Vallejo 70.989 Model Color Sky Grey, and finally I gave it a very light drybrush of Vallejo 70.993 Model Color White Grey.

I airbrushed Vallejo 26.517 Gloss Acrylic Varnish over the upper assembly, followed a couple of days later by an airbrush of Vallejo 26.518 Matt Acrylic Varnish. I then applied a dot of Citadel Technical 'Ardcoat over the scope lenses (I feel it's a bit more glossy than the Vallejo, though I haven't really tested that theory).
I had initially intended to add some shading to the clear resin of the ghostly ectoplasm, so I primed the lower assembly with the Vallejo Matt Varnish. Ultimately I decided the ectoplasm looked good as-is and didn't put anything on it. I did however paint Vallejo Sky Grey into the base and clean up the rim with Vallejo 70.950 Model Color Black.

After this I airbrushed the lower assembly with the Vallejo Gloss Varnish. Once this was dry I applied Jot P.V.A. Adhesive & Sealer (a waterproof hobby PVA) to the base, then sprinkled on a generous amount of Citadel Snow, padding it down very lightly with a brush. Once this was dry I removed the excess snow, only to find that the snow looked very thin and flat. So I went back and brushed another layer of PVA on top of the snow, then mixed the PVA with the snow and carefully applied that on top, finishing with a final generous sprinkling of snow and a light pat-down with a brush. This time the results were better, looking fuller and fluffier.

After the snow on the base had dried I airbrushed on the Vallejo Matt Varnish again. Once that was dry I finally attached the upper and lower assemblies. Which was more hassle than I had expected, and almost went horribly wrong. Luckily I eventually managed to get them mated nicely, although I did end up pinning them together, and sadly the pin channel is slightly visible in the clear part. Luckily it's not really noticeable unless you're looking for it.

I was worried about the superglue leaving a frosty residue on the surrounding areas, and that's exactly what happened. I found some advice online that suggested using a heat gun or vaseline to remove the residue. I very carefully tried the heatgun, but the resin started to go soft with no visible effect on the frosting, so I quickly abandoned that terrible idea. Instead I carefully brushed on some vaseline, then carefully removed the vaseline with some warm water and dishsoap. This did remove the hazing, but seemed to leave the surfaces slightly glossy even after being left to dry for hours.

I don't know if it actually took off the matt varnish, or if it just affected the surface; I've heard that a matt finish can eventually turn glossy with handling as the microscopic rough surface neccessary for a matt finish can get pressed/worn smooth. Regardless, I went back and applied yet another quick coat of Vallejo Matt Varnish. And that, thankfully, was finally it.


As you can see this guy was a bit of a journey. Between the resin casting, the modification, the difficulty finding enough different browns, the basing, and the issues with final assembly, this guy took WAY more time and effort than the average 32mm "human" figure. But hey, he's a cool model who came out pretty well. I named him "Simo Häyhä" after a legendary Finnish sniper known as "The White Death". I think the name fits.


EDIT 29/01/2025: The clear resin for the lower body had started to show clear signs of yellowing. To try to reduce further yellowing I washed the model in warm water and dishsoap, then sprayed it with Mr. Hobby Mr. Color GX 113 UVCut Flat. I don't know how much good it will do; this resin - which is labelled "Art❤Resin" and is basically the only one I've found locally - does not seem to be very resistant to yellowing. Here's how it looks now:

Friday, July 8, 2022

Apes Improvise Armaments

For some reason I had an easier time with this bunch than with the previous batch. I wanted to try some different colours on these guys, giving them darker fur and a slightly different leather colour, though I stuck with the same green for the armour. As I was working on them I realised one had a very bad miscast on his left arm. Rather than wait for a replacement, I decided to give him a hook, which would mark him as the leader. I had a really hard time deciding on a colour for the guns. I wanted a military colour, and was thinking about using a khaki/tan like I had on my GUARD's units as the weapons are clearly repurposed from human militaries. However a jungle green felt more fitting for some reason, though I was worried about the guns not standing out from the armour in that case. I tested several colours before deciding on a dark, almost brownish green.
Citadel Foundation Gretchen Green, Formula P3 Battledress Green, Citadel Foundation Knarloc Green, Citadel Base Castellan Green
Ape Gunners:
After priming with Vallejo 73.660 Surface Primer Gloss Black then P3 Menoth White Highlight, I basecoated in Vallejo 72.730 Game Air Goblin Green.

This time I used Green Stuff World 1832 Redwood Brown for the fur, which I drybrushed with Formula P3 Rucksack Tan. The skin was the same Vallejo 70.992 Model Color Neutral Grey, roughly highlighted with Vallejo 71.132 Model Air Aged White. After picking out the fingernails with Aged White (iirc), and painting the eyes with Menoth White Highlight (thinned with P3 Mixing Medium and water) and Redwood Brown (thinned with Mixing Medium), I glazed the skin and eyes with Citadel Shade Seraphim Sepia.

For the leather this time I wanted to try my new Formula P3 Bogrin Brown. I was worried it might be too rich, but I think it came out nicely. For the brass fittings I applied Citadel Layer Gehenna's Gold over the same brown. The goggle lenses were the same mix of Green Stuff World 1872 Metal Color Neptunus Blue and Scalecolor SC-66 Speed Metal that I used for previous apes. The spare ammo was simply Citadel Base Mephiston Red; I didn't want to go brighter as I didn't want to draw attention away from the rest of the model.

The colour I finally settled on for the field guns was Citadel Base Castellan Green. The metal bits were Citadel Base Leadbeltcher, and the tires were Vallejo 70.862 Model Color Black Grey.

After all that I dipped the models in The Army Painter Quickshade Dip Dark Tone, carefully mopping up the excess with a brush, then airbrushing on Vallejo 26.518 Acrylic Varnish Matt after the dip had dried. I was a bit heavy-handed with the superglue when glueing them to their base, and there's some frosting on the models' legs. I'm sure I could get rid of it if I could be bothered.


Overall I think they're fine, and I'm feeling motivated to knock out my last Ape unit just so I can say my Apes are done. Now I'm not saying I WILL be doing that anytime soon...

Monday, June 13, 2022

Turning Heel

I got to host a couple of intro games today for some newcomers to our local gaming group. I started off with Monpoc; I think it's quite easy to get into and is fairly visually appealing as my models are actually painted. Given the choice, The Man In Black and Wheatley chose the Terrasaurs, so I played GUARD.


Turns 1-3:
As usual I went first so I could demonstrate the basics. I brought in some units and demonstrated combined attacks against some buildings, failing to do any damage. For their first turn Black and Wheatley brought in some units and, not wanting to destroy any buildings since Terrasaurs are the good guys, they secured them instead. In my monster turn I demonstrated stepping, and finally blew up a building for a power die, firmly establishing GUARD as the bad guys in this conflict.
Turn 4:
Terra Khan ran up, punched Defender X in the nose, then ran and hid behind a building.
Turns 5-7:
I brought in a repair truck and used it to put out the fire in the building I had destroyed. I also whiffed a couple more unit attacks. Notorious MiB and Oately reinforced their power base. In my second Monster turn I was finally able to demonstrate what the game is really all about, as Defender X grabbed Terra Khan and threw him into the building he had been hiding behind, doing a full 3 damage, before stepping back.
Turns... I lost count...:
Understanding how power attacks worked now, The MiB and Wheatos were faced with a difficult moral quandry: toss Defender X into two buildings for 5 damage, or stick to their morals and avoid deliberately causing collateral damage to the city. In the end it was decided that sacrifices had to be made for the greater good; after all, 5 damage is 5 damage! I responded by rebuilding the first building that I had knocked down, seizing the moral high ground. I also tried to put some damage into Terra Khan with my tanks, but that didn't go so well: The Bellowers had no such difficulty chipping away at Defender X, so I retaliated with Mr. Tank, who finally managed to get through Terra Khan's scaley hide. At this point Defender X was in Hyper mode, so I was able to use Beat Back on his blast attack to knock Terra Khan into another building. I ran two Monster turns in a row to weaken the Terrasaur's power base with a stomp attack.
Turn Schfifty Five:
With Defender X at one health, a combined attack from four Bellowers and a Spinodon failed to knock off his last point of damage. Irritated with his underlings, Terra Khan picked up Defender X and body-slammed him onto two of the Bellowers to make an example out of them, winning the game in a surprising heel turn. I guess Nolan was right: you either die a hero, or live long enough to see yourself become the villain.


We were joined mid-game by another newcomer, The Painted Man. After the Monpoc game I took the opportunity to demonstrate Warmachine. I had a Sorscha2 Brawlmachine-legal list I had put together at the behest of some forumites. It has Doomreavers to actually do work, Beast 09 because he's a beast, a Destroyer because it's a safe pick, Reinholdt and the Koldun Lord for rerolls, and Alexia1 to make up points and put some bodies on the table.
(Khador: Wolves of Winter)
[Sorscha 2] Forward Kommander Sorscha [+28]
- Beast 09 [16]
- Destroyer [13]
- Reinholdt, Gobber Speculator [3]
Koldun Lord [0(3)]
Alexia Ciannor & the Risen [8]
Doom Reaver Swordsmen [10]
- Greylord Escort [3]

I gave Painted Man a Kozlov list I had carelessly thrown together earlier. Since Kozlov is low on speed buffs but heavy on damage buffs, I went for two shooty jacks; the Demolisher's high ARM should help ensure it has the opportunity to counter-punch if the army eats an alpha. Nyss Hunters are one of the better units I own for intro games as they are simple and are decent at both ranged and melee; with Valachev and Kozlov's buffs they could potentially crack a lot of amour on the charge. The Forgeseer and Wardog would make up the points, enable Gang, and had the rare distinction of actually being painted.
(Khador: Wolves of Winter)
[Kozlov 1] Lord Kozlov, Viscount of Scarsgrad [+28]
- Decimator [15]
- Demolisher [16]
- War Dog [2]
Greylord Forge Seer [0(4)]
Cylena Raefyll & Nyss Hunters (max) [16]
- Koldun Kapitan Valachev [4]


Pre-Game:
We were playing on a rather small table, just under 30" across, so I used a 3' mat. I threw down some simple terrain around a 12" zone in a vague approximation of a Mosh-Pit scenario, with the simplified ruleset of "any model can score if it's in the zone and no enemy models are in the zone, starting from the second player's second turn".


Deployment:
I put Sorscha's battlegroup in the center, the forest on the left forced my DoomReavers to my right (the lines were too close for advanced deployment to make sense), and the Risen brought up the rear. My Koldon Lord went nowhere, because I forgot he was in the list. TPM put his jack in the trench and Nyss in the forest.
Round 1:
I ran everything forwards except Alexia and the Destroyer. The Destroyer put some damage onto the Forgeseer, and Alexia created a Thrall who ran up to obstruct the Nyss.
The two jacks shot down most of my Doomreavers, leaving one knocked-down survivor who passed his Tough roll. But the Forgeseer cut him down, using Battle Wizard to cast a Hoarfrost that scattered onto a couple of Risen. The Nyss circled my army and put a big CRA into Beast, who used Hyper-Agressive to close the distance. Valachev meanwhile killed the Thrall and was able to Frostbite Reinholdt to death. Kozlov advanced behind the Forgeseer.
Round 2:
Beast 09 casually murdered most of the Nyss with a couple of swings. The Destroyer charged and killed the Forgeseer. Alexia took a double-boosted shot at Kozlov but only did 3 damage, which he ignored using Focus. The Greylord Escort cast Frostbite at Kozlov, missing him but killing the Wardog.

I pointed out to TPM that he might have an assassination vector on Sorscha: running Valachev to engage her, knocking down the Destroyer with the Decimator, and then Sidestepping Kozlov off a Risen would get Kozlov into Sorscha. TPM had other plans however.

Valachev walked and Zephyred over to engage the Destroyer, while the remaining three Nyss walked around Beast 09, giving him a wide berth, in order to cut down Alexia. Kozlov retreated and cast Fury on the Decimator, who charged the Destroyer, crippling his cortex and right arm. The Demolisher advanced slightly and but some boosted shots into Beast 09, doing a fair bit of damage but not crippling any systems. Round 3:
Unable to charge the Demolisher as it was in his back arc, Beast 09 instead opted to finish off the Nyss. With no Focus and a crippled axe arm, the Destroyer whiffed his only attack on the Decimator. The Greylord Escort once again failed to Frostbite Kozlov. Sorscha rolled 3 attacks on her quad-iron and put all three into Valachev, somehow leaving him with a single box! I should mention here that I forgot to give Valachev the defensive bonus for being engaged in melee. Oops. Anyway, Sorscha then cast Cyclone to withdraw.
The Decimator finished off the Destroyer. Valachev attacked Beast 09 but at dice-11 he predictably did no damage. Kozlov swapped Fury over to the Demolisher and popped his Feat. The Demolisher then charged Beast 09 and finished him off with a single attack.
Round 4:
Sorscha charged the Decimator; her second attack crit and left him stationary, but even so she was only able to cripple his buzzsaw.
The Decimator shook Stationary and tried to step out of melee range so he could knock Sorscha down with his gun, but the free strike crippled his other arm. Boosting the attack rolls for two dice wasn't enough, and Sorscha remained on her feet... until the Demolisher charged in alongside Valachev and put her down with his third MAT 8 P+S 21 attack.
Post-Mortem:
The games were a lot of fun, more so than most intro games I've held. I was impressed by how quickly everyone picked up the rules and started making strategic decisions.

I find it interesting that in several of the Monpoc intro games I've held, new players were intially confused by my eagerness to destroy buildings despite playing a "good guy" faction. Obviously I'm doing it initially to demonstrate the game mechanics. Guess I need to hurry up and get some Destroyers on the table.