 When I saw the first concept art of Ol' Grim, I was instantly hooked.


 As if Widowmakers weren't already cool enough, they went and gave us one that's a ghost. How cool is that? As impactful as the official colour scheme is, I decided I wanted to go proper ghostly with this guy, and took my first steps into resin casting in order to do it.


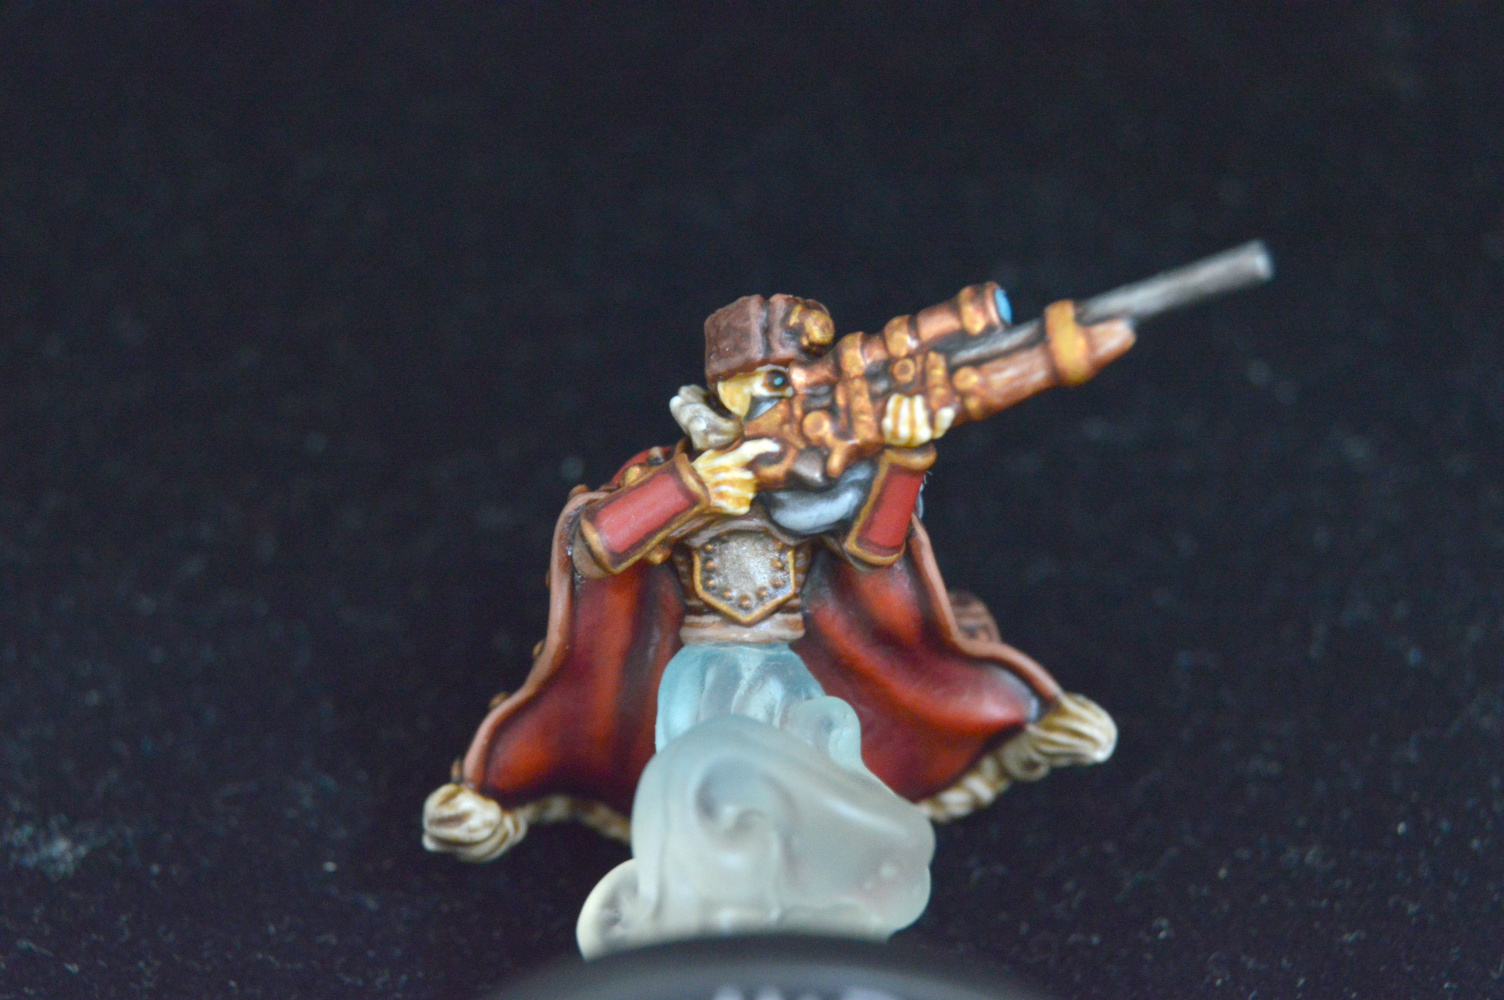
 He's actually surprisingly difficult to photograph; I put a fair bit of of work into both sides of his coat, but the underside is only really visible from underneath, and you have to look almost straight down to appreciate the detail on the top.
 This was the first model in quite some time that I really wanted to paint for myself; I've only been painting stuff for others, or knocking out quick Monsterpocalypse models that I wasn't really invested in, for a while now. It was surprisingly hard to get started; I feel like I'm being pulled in so many different directions these days that the idea of sitting down to spend many hours painting a model feels like a heavy burden. But luckily I had a bit of free time and I mostly enjoyed the process once I commit to it.
Casting the clear bit took a couple of tries. The first attempt had some holes in it. The second time was better, and I was mostly able to fill the few holes that did occur using UV resin. I also tried to create a bit of an internal swirl of a blue glow-in-the-dark powder pigment, but it basically just sank to the bottom of the mold (I was using vibrations to help bubbles rise to the surface, and that seemed to help the powder to sink). Luckily I think that actually looks pretty good; I like it more than the first completely clear cast anyway.


 It looked pretty cool after I hit it with some gloss varnish; I was tempted to leave it this way, but figured I would save this look for water and ended up finishing it with matt varnish.
 I painted the upper assembly separately. While doing so I realised there was a miscast on the muzzle of the rifle. I tried fixing it with greenstuff, but ultimately decided I would be happier if I modified the gun, so I stripped the paint (which wasn't too bad as I had only just started) and customized the gun barrel and stock. In the photos below you can see some paint that was dissolved in blob of superglue on the face and wouldn't come off. Don't worry, I eventually got it off using a superglue remover.


Ol' Grim:
The upper body was primed with Mr. Hobby Mr. Finishing Surfacer 1500 White. The coat and ushanka were basecoated in Green Stuff World 1832 Redwood Brown. I washed them with Citadel Shade Agrax Earthshade then applied some rough highlights with Reaper 09225 Master Series Paint Core Colors Redstone Highlight. The coat lining was first basecoated with Citadel Base Khorne Red, then I built up highlights using thinned Citadel Base Mephiston Red then thinned Vallejo 72.010 Game Color Bloody Red. I gave it a wash of Citadel Shade Carroburg Crimson, then re-applied the highlights of Bloody Red.
The armour was also basecoated in Khorne Red then highlighted in Mephiston Red. The armour trim was basecoated in Redwood Brown. I wanted the trim to be brass, but I didn't want to go too bright as the rest of the coat was quite dark, so I used the slightly dark Scalecolor SC-92 Victorian Brass. This was washed with Citadel Shade Agrax Earthshade, which was allowed to darken the adjacent red areas to shade them. I then highlighted back up to Victorian Brass. The breastplate used the same brass for the trim, but the rest was Citadel Base Leadbeltcher (which I might have given a light wash of Citadel Shade Nuln Oil).
I didn't want the shirt to be in the same colour as the coat, but I still wanted it to be in the off-white/brown range, so I ended up using Formula P3 Bootstrap Leather, which I washed with Agrax Earthshade then highlighted with a mix of Bootstrap Leather and Formula P3 Hammerfall Khaki.
For the rifle stock I went with Formula P3 Rucksack Tan, on which I tried to paint a wood grain effect using P3 Menoth White Highlight. I went for a brighter brass on the rifle itself in the hopes that would help differentiate it from the armour a little, using Citadel Layer Gehenna's Gold. I didn't want this big solid block of brass covering most of the rifle, so I painted the scope in Vallejo 71.068 Model Air Metallic Copper. I then washed all the rifle wood, brass, and copper with Citadel Shade Ogryn Flesh. I did then roughly highlight the brass with Scalecolor SC-73 Dwarven Gold as the wash had blended it in a bit with the copper. The badge on the ushanka was painted the same way as the brass on the rifle. The steel rifle barrel was painted in Vallejo Game Color Chainmail Silver (again, aiming for a brighter colour than the armour) then washed with Citadel Shade Nuln Oil. I added dots of my now-standard mix of Green Stuff World 1872 Metal Color Neptunus Blue and Scalecolor SC-66 Speed Metal for the scope lenses.
I had a hard time with the fur trim. A light colour felt right, but I didn't want it to blend in to the bones. I settled on a basecoat of Vallejo 71.122 Model Air US Desert Armour 686. I tried shading it with Seraphim Sepia, but I didn't like it, so I painted over it with a fresh coat of US Desert Armour 686. I remembered that I had a whole bunch of brownish Army Painter washes stashed away somewhere, so I pulled them out and tried to compare their colours. I settled on The Army Painter Quickshade Washes Soft Tone, which seemed to me to be similar in colour to Citadel's Agrax Earthshade but somewhat lighter. I then drybrushed the fur with Formula P3 Jack Bone, then went over the tips with another drybrush of Formula P3 Morrow White.
Ol' Grim's ol' bones were painted in P3 Menoth White Highlight, washed with Citadel Shade Seraphim Sepia, then highlighted back up with Menoth White Highlight. I was running out of browns, so I settled on Formula P3 Bogrin Brown for the eyepatch, which I also shaded in Seraphim Sepia. After the bone was done I added extra shading to the eye with Nuln Oil, then added a dot of Citadel Edge Baharroth Blue on the raised center. The beard was basecoated in Vallejo 70.992 Model Color Neutral Grey (by accident; I originally intended to use a lighter shade but picked up the wrong bottle and decided to go with it) then washed with Nuln Oil. It was then drybrushed with Vallejo 70.990 Model Color Light Grey, then Vallejo 70.989 Model Color Sky Grey, and finally I gave it a very light drybrush of Vallejo 70.993 Model Color White Grey.
I airbrushed Vallejo 26.517 Gloss Acrylic Varnish over the upper assembly, followed a couple of days later by an airbrush of Vallejo 26.518 Matt Acrylic Varnish. I then applied a dot of Citadel Technical 'Ardcoat over the scope lenses (I feel it's a bit more glossy than the Vallejo, though I haven't really tested that theory).
I had initially intended to add some shading to the clear resin of the ghostly ectoplasm, so I primed the lower assembly with the Vallejo Matt Varnish. Ultimately I decided the ectoplasm looked good as-is and didn't put anything on it. I did however paint Vallejo Sky Grey into the base and clean up the rim with Vallejo 70.950 Model Color Black.
After this I airbrushed the lower assembly with the Vallejo Gloss Varnish. Once this was dry I applied Jot P.V.A. Adhesive & Sealer (a waterproof hobby PVA) to the base, then sprinkled on a generous amount of Citadel Snow, padding it down very lightly with a brush. Once this was dry I removed the excess snow, only to find that the snow looked very thin and flat. So I went back and brushed another layer of PVA on top of the snow, then mixed the PVA with the snow and carefully applied that on top, finishing with a final generous sprinkling of snow and a light pat-down with a brush. This time the results were better, looking fuller and fluffier.
After the snow on the base had dried I airbrushed on the Vallejo Matt Varnish again. Once that was dry I finally attached the upper and lower assemblies. Which was more hassle than I had expected, and almost went horribly wrong. Luckily I eventually managed to get them mated nicely, although I did end up pinning them together, and sadly the pin channel is slightly visible in the clear part. Luckily it's not really noticeable unless you're looking for it.
I was worried about the superglue leaving a frosty residue on the surrounding areas, and that's exactly what happened. I found some advice online that suggested using a heat gun or vaseline to remove the residue. I very carefully tried the heatgun, but the resin started to go soft with no visible effect on the frosting, so I quickly abandoned that terrible idea. Instead I carefully brushed on some vaseline, then carefully removed the vaseline with some warm water and dishsoap. This did remove the hazing, but seemed to leave the surfaces slightly glossy even after being left to dry for hours.
I don't know if it actually took off the matt varnish, or if it just affected the surface; I've heard that a matt finish can eventually turn glossy with handling as the microscopic rough surface neccessary for a matt finish can get pressed/worn smooth. Regardless, I went back and applied yet another quick coat of Vallejo Matt Varnish. And that, thankfully, was finally it.
As you can see this guy was a bit of a journey. Between the resin casting, the modification, the difficulty finding enough different browns, the basing, and the issues with final assembly, this guy took WAY more time and effort than the average 32mm "human" figure. But hey, he's a cool model who came out pretty well. I named him "Simo Häyhä" after a legendary Finnish sniper known as "The White Death". I think the name fits.
EDIT 29/01/2025: The clear resin for the lower body had started to show clear signs of yellowing. To try to reduce further yellowing I washed the model in warm water and dishsoap, then sprayed it with Mr. Hobby Mr. Color GX 113 UVCut Flat. I don't know how much good it will do; this resin - which is labelled "Art❤Resin" and is basically the only one I've found locally - does not seem to be very resistant to yellowing. Here's how it looks now:


